Showing posts with label Stuff I make. Show all posts

Tuesday, June 25, 2024

Thrifted and Altered

I noticed artprints/artwork were being altered  so figure why not.  I found this framed print at the thrift store and knew I was going to alter it into a Halloween theme piece.  
Loved the animals.


What do you think?  How'd I do?  This was fun and I will be setting it out during the Halloween season!  Great trick or treaters!


Monday, June 17, 2024

Blue Door, Part 4

The blue door, after sanding, touching up the blues, aging it and now on it's hinges.  Still need to add a door jam stop, the handles, house number and then the bell.  Love how fresh it all looks.   The blue door is so heavy and I'm glad no fingers or toes were hurt in moving it!


Wednesday, June 12, 2024

Blue Door Repair, Part 2

We took the door off the hinges and it is extremely heavy!  Removed one board that was heavily water damaged.  I used a two-part bondo to repair all the cracks.  It all got a good sanding.  It refreshed the blues.  Found a piece of wood in my wood pile to that fit exactly.  It was a very early morning so we could avoid the hot sun.  Tomorrow morning I'll tackle the other side.


We removed the bell and I'm not going to touch the finish.  I like the look of it.  Love the sound the bells make.


Blue Door Repair

I took a trip to Mexico many years ago.  We stayed in Patzcuaro, Michoacan for a week and it was one of those weeks where I ended each day thinking this day was even better than yesterday when I thought yesterday was the best day.  The sights, the people, their craftsmanship, the food and which made my soul overflow.  Across the street from the motel was a wood shop full of carpenters and carvers and they let me spend the day watching and learning.  I drew lots sketches and when I came home we put up a courtyard wall and it needed a door.  I built this door from my sketches.  I painted all shades of blues and aged it.  I love my blue door, everyone knows my house because of my blue door.  The bell inside the window was from another stop in Mexico.  This door was built around 2007 and boy it needs some TLC.  Plus, the side boards need some repair so the door had to come off today.  I will be replacing some wood and repairing some boards.  I'll get busy finding matching blue paint colors to refresh the color.    

Side story, when we had our house painted and all the trim was painted black.  As they removed the paper and tape from the windows, I saw my blue door painted black!  Omg, I rushed out and said take that black off!  The painters simply said oh, we'll paint back to blue for you, I'm like no, it's layers of this blue and that blue.  Luckily the wax finish on the door protected blues underneath.  They spent an hour peeling black latex paint off.


Sunday, June 9, 2024

Baby Boy Shower Gift for the New Daddy!

Got invited to a baby shower.  I'm not one for baby showers but when I do go I always make some kind of gift.   I've known the baby boy's dad to be over 20 years which I decided to make him a daddy tool belt.  I've been making them for some time.  It's always fun.

The new baby's theme was rockets.  I found some rocket clipart to transfer on the tool belt and luckily found a few rocket items, like star whatever that is, and a rocket chewie.  Blue is the color of as many items I could find, bottle, duckie, gloves, diaper pins,  pacifiers, it was fun to put together.  Finished it off by wrapping in clear wrap.  I think he'll have fun opening it up.  Found out, the favorite name so far for baby is Javi, love it.  Momma looked sweet and the shower was so nice, I won a gift!  A scented candle.


Thursday, June 6, 2024

Sweet Salsa

On a visit with one of my sister-in-laws, she offered up some salsa and chips.  I, of course asked for the recipe and she mentioned it was a family recipe and I told her I understand and finished up the bowl of salsa.  I searched the internet for a similar type recipe and found a few.  A few weeks later she sent me the recipe, happy salsa dance day!    

 Chopped up ingredients

Tomatoes!

Everything all chopped up.

All in a pot and finish up with the spices.


Set to boil and then simmer.

It came out so good.  
Thanks so much to Carla for generously sharing the recipe!
I need a bag of chips

Do you make salsa? 


Sunday, May 26, 2024

Sunday Breakfast

I'm not a early morning person which also means I'm not a first thing in the morning breakfast eater. Today I set the alarm so not to miss the Indy 500 race. It was on a rain delay. So what to do with my extra time this morning. Why not have breakfast. Nothing fancy but kinda fancy for me.
The only thing missing is BACON! What is your not so fancy kinda breakfast?

Sunday, July 26, 2020

Paintings

I needed something to do.  Found a pile of  5"x7" canvas panels and so got my paints out. Found some paper scraps and the glue stick.

It's all in the details!

Why one painting when you can do nine!
Decided on painting assembly line style!   This actually was kinda fun.  I plan to paint Latina inspired angel girls on each panel and then I will continue to embellish them.

Wednesday, July 22, 2020

Salsa

Made mango strawberry salsa today.  I had only one mango so I added strawberries.  Pass the chips, please!


Tuesday, July 21, 2020

A quick snack

Made these...yummie!  We've been craving s'mores.  However, it's so hot no time for a fire pit and last camping trip in the forest, no open fires allowed!  A friend posted this recipe and I tried it out!  I had all the ingredients leftover from our camping trip.   The recipe is easy.  One tip is to keep a close eye when you have them under the broiler!  They brown quick.

Here's the recipe....  It's from the website kitchenfunwithmy3sons.com

S'mores Cookie Cups

With these S'mores Cookie Cups, you can enjoy the flavor of s'mores any time! Buttery graham cracker cups filled with toasted marshmallow and topped with Hershey's Chocolate Bar, everyone will be asking for s'more!
Course Dessert 
Cuisine American 
Prep Time 10 minutes
Cook Time 8 minutes
Servings 24 cookie cups
Author Kitchen Fun With My 3 Sons

Ingredients

  • 1 cup finely crush graham cracker crumbs (about 7 whole graham crackers)
  • 1/4 cup powdered sugar
  • 6 tablespoons butter, melted
  • 12 marshmallows (regular size, not mini marshmallows)
  • 2 full size Hershey's Chocolate Bars, unwrapped and divided into 24 pieces

Instructions

  1. Preheat oven to 350F.
  2. In a small mixing bowl, combine the graham cracker crumbs, powdered sugar, and melted butter.
  3. Grease a 24 cup mini muffin pan with non-stick cooking spray. Scoop the graham cracker crust mixture into the 24 cups. Gently press the crumbs into the bottom of each cup and up the sides to form little cups.
  4. Bake the mini graham cracker crusts at 350F for 4 minutes until golden brown.
  5. Cut each marshmallow in half to make 24 round marshmallows. Place one marshmallow in each graham cracker cup, cut side of the marshmallow facing down.
  6. Set the oven to broil. Place the pan of s'mores in the oven under the broiler and broil for 1-2 minutes, just until the marshmallows are soft and beginning to look toasted. Note: the marshmallows can burn fast, so watch them very closely.
  7. Top each marshmallow with one piece of the Hershey's Chocolate Bar. Allow the s'mores to cool for 15 minutes, then use a butter knife to lift them from the pan.

Saturday, April 4, 2020

Sewing masks!

Searched internet to get a pattern and ideas of what supplies I could use.  Whoola! found what I needed  There's so many good DIY videos.  Thanks to all the contributors.


I found my black elastic cord I use with my bullet journal inserts.  There were so many ideas on what to use for the metal piece around the nose.  I found these file thingies and they will work perfectly!


The pieces are double layered with a slip area for the metal pieces.  There's also a pocket to insert a filter.   Add cords and tie off.  I left the ties knots out so they can be fitted.  Sewing through the thick layers once you put the folds in was challenging, but overall I find sewing relaxing.
Sent these home to all my family members.  I'm working on 30 more today to give out to friends.  I'm using a much simpler pattern idea so I can make my elastic cord go further.  Using 7" per side as opposed to 10".   They won't have the metal nose piece nor the pocket for a filter.

Monday, January 13, 2020

This year's card, part 4

This is my 2019 Xmas card!  I ended up using only one of the girl photos.  I altered five or six of them and time was not wasted because I will be using the altered photos for another project.  You'll need to stay tune for that.  I added texture by using a star stencil with texture paste I tinted with green glitter!  I love glitter!!!  I added red glitter drops to the crown stars and glitter to her wings.  I titled the card  "La Princesa de Naveidad"  The Christmas Princess.  I added a papals banner. 
The Christmas Princess
Handmade envelopes and labels

Back of envelope.  Open end style
I made a template and cut the envelopes out of this wonderful green thin paper.  The paper is a paint masking paper you can find in the paint isle in any home improvement store.  I love everything about this paper!  I use it for so many projects.  The labels are printed on Japanese rice paper.  Both papers are strong even tho they are thin.

I'm really happy how my cards turned out.  I never stress about my xmas card.  The ideas for my xmas cards come along all year long.  I like to use a technique, a paint, a color, a paper, a image, words I come across throughout the year.  If I must be honest my head overflows with creative ideas all the time.  I write or sketch ideas daily!!   

Monday, December 2, 2019

This year's card, Part 3

Scoured the internet looking at label image ideas.   I found this great looking one which will be perfect.  I used Photoshop to edit and clean it up so I could use it as my mailing label!  I love, love, love how it looks.   Handmade envelopes are ready, too.


Working on embellishing my card images.  And of course, my printer needs ink so no printing as of today.  Ordered ink and it's on it's way!


Wednesday, November 27, 2019

This year's card, Part 2

Working on the envelopes.  I couldn't find what I want on any  online shops.  So what do you do?  Make your own envelopes!   I made a template and I'm using a green tinted paint mask off paper I got at home improvement store.  I love the feel of the paper and it's study but thin.  It'll work perfect for my handmade cards!


Monday, November 25, 2019

This year's card

Sneak peek....


Vintage (public domain) images I found on the internet.  Resized them,  desaturated, and painted using my iPad and Procreate app.  I have more embellishing to do!  So far I love love love!

Thursday, November 14, 2019

Holiday project with friends!

My friends, Becki and her mom, Alice asked to get together for a holiday craft day.  Becki is very crafty but he mom is not really all that interested but we insisted she joint in.  

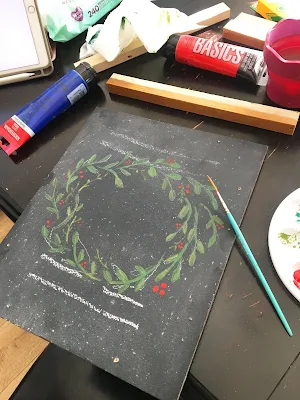
Becki found a number of ideas on Pinterest.  I decided on this one.  I pretty much had all the supplies in my craft stash and that's the reason I picked this one.


This is mine.  Free hand painted the wreath and red berries.  Not bad.


Alice's sign, not bad for someone who brags about not having any creative talent.
Becki's sign looks good!

My finished sign!  Love, love, love it!  Had so much fun with Alice and Becki.  Oh, Becki's 4 yr old daughter joined in the fun...she's adorable and full of creative energy!


Sunday, November 10, 2019

Wood project

I saw these little white wooden block decorations on Pinterest and thought I'd give it a try!  There are so many examples of these types of holiday decorations using simple wood shapes.


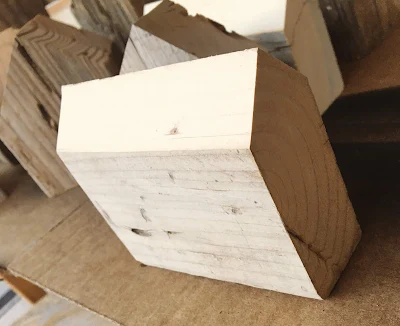
Dug through my wood pile and found a couple of 2x4 pieces.

Used the compound miter saw to cut the shapes.


First coat of white paint.  It cover well for a first coat.
I'll post an update when I finish them.
I'm also working on holiday sign with some friends this week and I'll post them, too.

Sunday, September 22, 2019

Love affair with paper

 I watched a YouTube video on making faux vellum paper.  I don't recall the name of the artist, sorry.  She used a can of clear spray paint on a variety of papers.  One paper she used was painter's masking paper.  I've been using the masking paper in the green tone and the brown tone colors for several years.  I first came across this paper at a shop in Albuquerque.  I love the lightness of it and love love love the colors.  It comes in 18" rolls so I cut it to 8 1/2" x 11" sheets and printed some vintage images and text on to them.   I gathered up a few pieces of pattern tissue, book pages, and tea dyed graphed paper.  I used clear matte spray paint I bought at my local Walmart.  Nothing fancy.  Used a box to lay the paper in and sprayed one side at a time.  You need to do this outside or in a very well ventilated area, believe me.  Hung them to dry and I love the way they turned out.  My favorite is the dress pattern tissue!  I may have to try a glossy clear next time.  The matte is nice but I'm curious how the glossy will make the paper feel and look.


Here is a sample of the masking paper.  It's not transparent but it does have a nice translucent look.


Sunday, September 15, 2019

Sticker crazy!

I used my Cricut machine this week.  I made stickers!  It's been a journey of so many unfortunate events to complete satisfaction!

First, I needed to design the stickers.  I ventured into my stash of inspiration drawings and images.  I came up with a whole set of greenery/floral tiny designs.  First, I sketch.


Once I get the basic designs on paper it gives me a good idea of what I want to use for my stickers.  I kept the designs simple as for my first attempt of making stickers.
From this point I get out my iPad and use the Procreate app to draw up the stickers.  Here's the process in video.


  Once the sticker sheet is done it's time to import it to Cricut Design Space.  Here's where the problems began!   Once I sized up the sheet I made two side by side and attached them.  Set up print/cut option.  I watched a tutorial on what settings to use on the Cricut for stickers.  I was making stickers on white sticker paper and clear glossy sticker paper, both for inkjet printers.  I have a Canon Pro 100 printer.  Once I hit printer I could not get the print settings  box to open.
Last week we had a electrical outage and all my printers were lost since the modem and router were shut down.    I had to add them and the setting just weren't coming up the same.  I added drivers and software updates, geez what a process so I figured this was the reason the Cricut software was not showing the print settings.  After more research I finally got it figured out.  One reason I needed to figure it out was the Cricut could not read the cut markers, what a mess.  Once all this got figured out it was  magic!


I was able to print and cut the stickers out.  I printed some on clear glossy sticker paper and a few sheets of white sticker paper.  The few sheets the Cricut would not read I cut out with scissors and craft knife.  


I put samples of both the clear and white paper stickers on some brown kraft paper to show you how they look.  I'm so pleased with how they turned out!  My brain is on creative overload on new designs, holiday designs, kids sticker designs, bullet journal stickers, planner stickers!  I must admit I'm really liking the clear ones.


Sunday, June 30, 2019

Inspired

I finished a two week road trip and being in a car all those miles sure stunted my creative soul.  Normally, I make stops on my trips that inspire me, but this trip was way different.  The destination was a family wedding, driving was the goal.  I was able to stop and visit a few friends who are creative souls and I realized how I haven't been in the mood to work in the studio.  Before I left I cleaned up my studio space and I'm glad I did.  Today I started making some necklaces.  I haven't made jewelry in a long time and it feels good to get back at it.  Next I'm going to finish my soldered pendants!