Showing posts with label Food. Show all posts

Saturday, June 8, 2024

Trip to Florida

We flew to Orlando for a wedding.  Never been anywhere in Florida.  Orlando is amusement park heaven.  Disney, every Disney, Seaworld, Epcot, and a million others I'm sure.  We weren't there for the parks but boy were there tons of amusement park tourist all over Orlando!  The weather was rainly most of the week.  However, we had a nice day and took a drive to Canaveral National Seashore Park.  It was so windy which kept away people I guess.  There was no one there but us.  It was pretty, can't ever get tired of seeing the ocean and that beautiful blue water.


 On our way back to drove through New Smyrna Beach looking for a place to sit and eat.  We googled pizza and that lead us to Prima Pizza @ 112 Sams Ave, New Smyrna Beach, FL 32168.  It was a small place and it was full and an hour wait.  We ordered to go, then went for a walk in the area.  I'll tell you the wait was well worth it.  Met a few locals and they raved about it.  The pizza was fresh & delicious .  Garlic rolls, amazing!   So much butter and garlic.  If you ever find yourself exploring outside of Orlando,  go there and eat.


Thursday, June 6, 2024

Sweet Salsa

On a visit with one of my sister-in-laws, she offered up some salsa and chips.  I, of course asked for the recipe and she mentioned it was a family recipe and I told her I understand and finished up the bowl of salsa.  I searched the internet for a similar type recipe and found a few.  A few weeks later she sent me the recipe, happy salsa dance day!    

 Chopped up ingredients

Tomatoes!

Everything all chopped up.

All in a pot and finish up with the spices.


Set to boil and then simmer.

It came out so good.  
Thanks so much to Carla for generously sharing the recipe!
I need a bag of chips

Do you make salsa? 


Wednesday, June 5, 2024

Bacon


Everyone loves bacon, right?  Okay I am a crispy but not burnt bacon eater.  Others are more of the I would say "under cooked"  types.  I saw a clip of someone saying for the perfect crisp bacon you need to "boil" it in water first!  
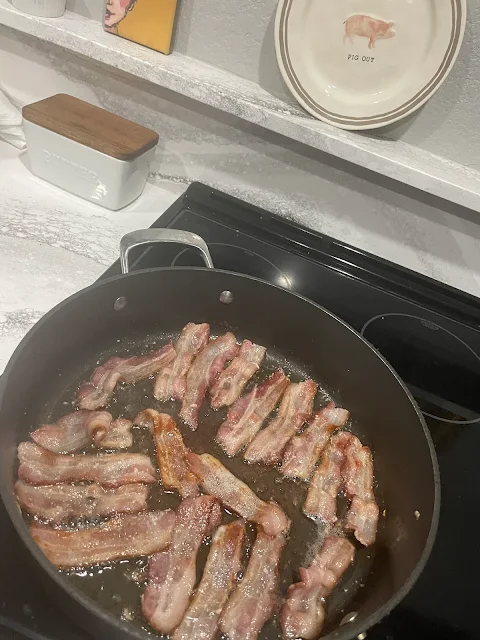
I decided to try it, because I LOVE me some crisp bacon and eggs.  I put water in the frying pan and added 1 lb bacon.  Set the burner temp med-high and waited for the boiling to begin.  I let it boil til all the water was gone.  What was left was bacon grease.  The bacon was not rolled up but more even and straight.  I lowered the temp and the magic happened!  The bacon cooked and became so crisp!


It cooked to so evenly and flat.  This is the finished boiled and fried bacon.  It was perfect!

This bacon was a hit!


On another note, I also baked a pound of bacon in a 350 degree oven to compare.  The oven bacon was cooked unevenly and was limp.  I didn't leave in oven to crisp because it would of over cooked in some areas and undercooked in other areas.

I say "boiling" your bacon is the way to go, try it!


Monday, May 27, 2024

Banana cream pie

Today is memorial day, which also gives a day to some good food. We cooked out burgers and then I figure I'll make a banana cream pie. Not from scratch scratch, though. I used store purchase graham cracker crust, Jello brand banana cream pudding and cool whip. I had bananas. It came out good and sweet. Next time I'll use sugar free pudding mix and pie dough crust.
</ div>
</.

Sunday, May 26, 2024

Sunday Breakfast

I'm not a early morning person which also means I'm not a first thing in the morning breakfast eater. Today I set the alarm so not to miss the Indy 500 race. It was on a rain delay. So what to do with my extra time this morning. Why not have breakfast. Nothing fancy but kinda fancy for me.
The only thing missing is BACON! What is your not so fancy kinda breakfast?

Tuesday, July 21, 2020

A quick snack

Made these...yummie!  We've been craving s'mores.  However, it's so hot no time for a fire pit and last camping trip in the forest, no open fires allowed!  A friend posted this recipe and I tried it out!  I had all the ingredients leftover from our camping trip.   The recipe is easy.  One tip is to keep a close eye when you have them under the broiler!  They brown quick.

Here's the recipe....  It's from the website kitchenfunwithmy3sons.com

S'mores Cookie Cups

With these S'mores Cookie Cups, you can enjoy the flavor of s'mores any time! Buttery graham cracker cups filled with toasted marshmallow and topped with Hershey's Chocolate Bar, everyone will be asking for s'more!
Course Dessert 
Cuisine American 
Prep Time 10 minutes
Cook Time 8 minutes
Servings 24 cookie cups
Author Kitchen Fun With My 3 Sons

Ingredients

  • 1 cup finely crush graham cracker crumbs (about 7 whole graham crackers)
  • 1/4 cup powdered sugar
  • 6 tablespoons butter, melted
  • 12 marshmallows (regular size, not mini marshmallows)
  • 2 full size Hershey's Chocolate Bars, unwrapped and divided into 24 pieces

Instructions

  1. Preheat oven to 350F.
  2. In a small mixing bowl, combine the graham cracker crumbs, powdered sugar, and melted butter.
  3. Grease a 24 cup mini muffin pan with non-stick cooking spray. Scoop the graham cracker crust mixture into the 24 cups. Gently press the crumbs into the bottom of each cup and up the sides to form little cups.
  4. Bake the mini graham cracker crusts at 350F for 4 minutes until golden brown.
  5. Cut each marshmallow in half to make 24 round marshmallows. Place one marshmallow in each graham cracker cup, cut side of the marshmallow facing down.
  6. Set the oven to broil. Place the pan of s'mores in the oven under the broiler and broil for 1-2 minutes, just until the marshmallows are soft and beginning to look toasted. Note: the marshmallows can burn fast, so watch them very closely.
  7. Top each marshmallow with one piece of the Hershey's Chocolate Bar. Allow the s'mores to cool for 15 minutes, then use a butter knife to lift them from the pan.

Thursday, January 26, 2017

Gingerbread houses

The past several years I have decorated sugar cookies with some of my favorite little friends.  It's always way fun.  This year I decided to make mini graham cracker gingerbread houses to decorate.  I added another set of kids to the mix this year, too.  Overall, the decorating turned out to be just as much fun as cookie decorating.

I didn't have the patience to use royal frosting to "glue" the houses together, so I used a glue gun!  It worked perfectly and was so quick.


Cutting rectangles into triangles isn't so easy.  Lots of broken pieces!
My first completed house.  I thought it was kinda boring so mixed up the roofs

Addison is busy decorating her house.  The icing in a capped bottle wasn't working to well so we used a skewer to put the icing on the candy pieces...worked perfectly.
Addison & Olivia, Kailey and Avery showing off their masterpieces!  

They did a great job on their houses.  I had so much fun and we'll be doing this again.


I set up another gingerbread house decorating party.  I learned from the first party smaller pieces of candy and mini size cookies worked so much better and I bought icing in tubes and that worked even better.  Made my prep time less time consuming and easier for the kids to use.

This is Kail, Kalon and Reagan working on their houses!

Kalon was very determine to get his skittles to stick!
They did a wonderful job on their houses!


Saturday, March 19, 2016

Easter treats

 I checked out Pinterest and found these two Easter treat ideas.  One using pretzels and the other using rice krispies.

The first one I make was the preztel flowers.  Square pretzels, white chocolate melts and pastel m&m candies.   

 
I put 12 pretzels on a mircowavable place and then set a candy melt on each.  I mircowaved for 55 seconds, just enough to soften the melts.


Once the melts were softened, place a center candy and then six around to make the flower.  It helps to sort the colors.  This isn't as easy as you think....steady hand helps.


Aren't these the cutest!


I placed three in each bag and tied a banner flag using some bakers twine. 


Second treat was a rice krispie treat with a Easter twist.  Four bowls = four colors.  On some recipes I found you can use Peeps, but I didn't have any so I used liquid food colors.  Melt the butter first and then add the  marshmallows.  I used the microwave but you can make this on the stove top.


Once you have the marshmallow/butter mixture I added the color.  Easy easy and sticky.


I doubled the recipe.  I used bread pans lined with foil.  Sprayed with vegetable oil and set the rice krispies in layers color by color.  Let cool.


Winston and Maximus stepped into the kitchen to see what was going on...

Using a serrated knife I cut into 1x1 inch pieces.


I decided to make them into to pops, so I stuck a popstick into each piece.  Easy easy.


Used the printing software to make my banner strips.


Love how it all turned out!


Sent out two boxes of these treats to family.  Also, have enough left over for a few friends and a Palm Sunday dinner dessert. 


HAPPY EASTER!

Wednesday, February 24, 2016

Making Pasta

On my recent trip to Lucca, Italy (Yes. I went to Italy...still working on editing my photos!)  I ate a fabulous creamy mushroom pasta dish.  So I got the idea to make my own pasta and try to find a creamy mushroom recipe.  There are many pasta recipes on line with great instructions.  Here's the recipe I used.  I also used my mixer even though you can make it by hand.  It was well worth the effort.

HOMEMADE PASTA RECIPE

Yield: 1 1/4 lbs dough

INGREDIENTS:

  • 3 1/2 cups all-purpose unbleached flour, sifted (plus extra flour for preparing)

  • 1/2 teaspoon salt

  • 4 large eggs, beaten

  • 2 Tablespoons water


I mixed the flour and salt together then added the eggs and water.


Once mixed together it was drier than I thought.


Take the dough and make it into a ball and wrap with plastic wrap.


After the dough rests I ran it through the pasta machine.  Now I didn't have a food pasta machine, but I had a craft room pasta roller.  It's all I had and it worked okay, but tough to secure to my counter top.  I'm going to look into a real kitchen pasta machine.  I ran it through the machine a few times to get it the thickness of 1/4".   


After passing it through the pasta machine I rolled it and cut it into 1/2' strips.


This was the fun part.... figuring out how to dry it.  I used a clothes hanger to hang the pasta to dry.  I did find a creamy mushroom recipe but I didn't like it...too thick and not much taste.  Then again I'm trying to match the pasta dish I ate in Italy....  The pasta was good and I will continue to make.  I'm on the hunt for a pasta machine.